Using PowerShell
![]() Applies to: Windows Control
Applies to: Windows Control
You can use PowerShell to run commands directly at an end user, making it easier to run scripts and troubleshoot issues.
Open a PowerShell session
For managed devices
-
Go to Managed in the side menu.
-
Select the device from a device group.
For on-demand sessions
-
Go to On-demand in the side menu.
-
Select the required session.
Click Tools in the toolbar and select PowerShell.
When prompted, click Open to launch the 247connect Control. To skip this step in the future, select Always allow portal.247connect.cloud to open links of this type in the associated app.
By default, connecting to an On-demand Agent requires end-user approval. You can also enable end-user acknowledgement for Managed Agents in Device group settings. While waiting, you'll see a Connecting screen. Click Cancel to stop the request.
The PowerShell window
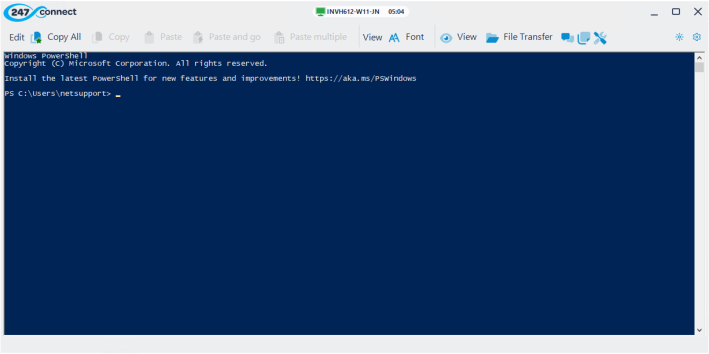
At the top of the window, you'll see the device name and session time. Icons indicate the session type:
|
|
Shows you are in a managed device session. |
|
|
Shows you are in an on-demand session. |
From the PowerShell window toolbar, you can:
Enter credentials to elevate the session (available for On-demand Agents only).
Copy and paste text to and from the command pane.
Change the font used in the command pane.
Open a View window.
Open a File Transfer window.
Start a chat with the end user.
Send a message to the end user.
Access tools, including Task Manager and Registry Editor.
Change the display theme.
Access the About information for 247connect, the Information Hub and options to download and install updates. When a new version of the Control is available, the icon changes. From here, you can choose to download and install the latest version now or wait until the session ends.
Command pane
Enter your PowerShell commands in the command pane and view the results.
While the session is active, 247connect stores each command you run. You can:
Press the up/down arrow keys to scroll through previous commands and press Enter to re-run one.
Press F7 to open a history window showing all previous commands. Select one and press Enter to run it again.
See also:
Manage Windows Control updates


