Managed devices
Managed devices are those with a permanently installed Managed Agent, enabling continuous monitoring, support and remote management. These devices are always accessible for remote control actions, ensuring reliable connectivity and streamlined maintenance for users.
View managed devices
-
Go to Managed in the side menu.
Note: By default, when you install a Managed Agent on a device, it appears in the Unassigned device group. You can't connect to or interact with managed devices in this group. To enable remote access, move it to a device group. Devices moved out of the Unassigned group cannot return to it for 90 days. You can use device assignment rules to move devices into a selected device group automatically. -
Select a device group to display its devices.
Note: You can search for managed devices by entering your search term in the search bar. Matching devices appear as you type and you can interact with a device using the remote feature icons. Click Close to end the search.
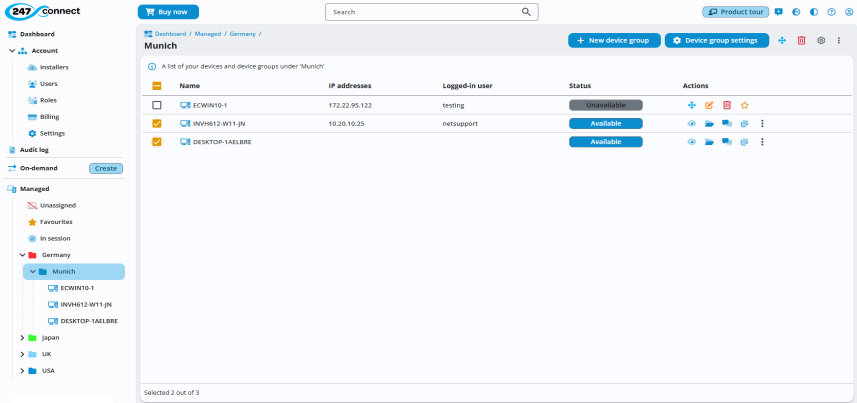
You can sort the table by clicking a column header. Click again to change the sort direction. An arrow icon next to the column header indicates the current sort direction.
You can
 icon at the top of the display area. In the Manage columns pane, remove a column by clicking the close
  icon or drag and drop column names to reorder them, then click Save.Note: Locked columns (indicated with a padlock
 icon) can't be removed. To reinstate a removed column, select it from the Add new column drop-down list. To restore the default column layout, click Reset.
You can export the table to a PDF or .CSV file. Click the three dots icon
 at the top right of the display area, then select Export to PDF or Export to CSV. The file is saved in your Downloads folder.
 -
The following information is shown for each device:
-
The name of the device.
-
The current IP address of the device.
-
The logged-in end user.
-
The current status: Unavailable, Available or In session.
The icons in the Actions column change depending on the device's availability status:
-
If a device is Unavailable, the column displays icons that let you manage the device, such as move, edit and delete.
-
If a device is Available, the column shows icons for performing remote control tasks, such as view, file transfer, chat and message. To access the device management options for an available device, click the three dots icon
 .
.
-
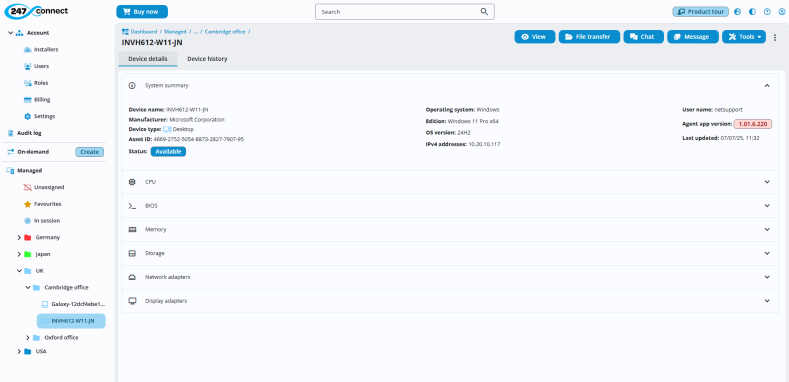
View device details
When you select a managed device, you can view detailed information about its hardware and device history.
-
Device details: Shows system and hardware information, current status and the Agent version.
-
Device history: Lists past activity and the user who performed each action. Click Filter to
-
From the toolbar, you can launch remote control functions, including View, File transfer, Chat, Message, or open the Tools menu to access additional features.
Edit a managed device
You can update the name of a managed device.
-
Select the required managed device.
-
Click the three dots icon
and choose Edit  .
.Or
Hover over the device in the side menu, click the three dots icon
 and select Actions > Edit.
 -
Update the device name.
-
Click Update.
Delete managed devices
You can delete managed devices individually or in bulk.
-
Click the Delete
 icon next to the device. If the device status is Available or already selected, click the three dots icon
  and choose Delete
  .
.Or
Hover over the device in the side menu, click the three dots icon
 and select Actions > Delete.
Or
To delete multiple devices, select the checkboxes next to each device. To select all devices, click the checkbox at the top of the column. Click the Delete
 icon in the top right.
 -
Click Yes to confirm the deletion.
Move managed devices
You can move your managed devices between device groups to better
-
Click the Move
 icon next to the device. If the device status is Available or already selected, click the three dots menu
  and choose Move .
Or
Hover over the device in the side menu, click the three dots icon
and select Actions > Move.Or
To move multiple devices, select the checkboxes next to each device. To select all devices, click the checkbox at the top of the column. Click the Move
icon in the top right.
-
Select the new device group (use the search bar to find the group, if needed).
Note: If you move a device to the Unassigned group, its -
Click Move.
Mark as Favourites
You can mark commonly accessed devices as
-
Select the required managed device.
-
Click the three dots icon
and choose  .
.Or
Hover over the device in the side menu, click the three dots icon
and select Actions > -
The device now appears in the
 again to remove it.
See also:
Managed device remote sessions


