Setting up two-factor authentication (2FA)
Two-factor authentication (2FA) adds an extra layer of security to user accounts by requiring two forms of verification when signing in, not just a password. You can require all local users to set up 2FA in the Account settings, or users can enable it themselves from their profile.
2FA works by linking your account to an authenticator app, such as Google Authenticator or Microsoft Authenticator.
Require all local users to set up 2FA
-
Go to Account > Settings in the side menu.
-
Enable the Require 2FA for local users option.
The next time a local user signs in to 247connect, they will be prompted to set up 2FA.
Set up 2FA
-
Click the Profile
 icon in the top menu.
 -
Select the Profile tab.
-
Click Set up 2FA.
-
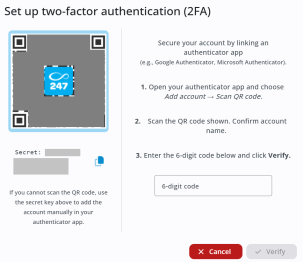
Open your authenticator app and choose Add account > Scan QR code.
-
Scan the QR code shown and confirm the account name.
-
Enter the 6-digit code from your authenticator app and click Verify.
-
Your recovery codes appear. Save these in a secure location for use if you lose access to your authenticator app. Click Copy to save the codes, then Close.
2FA is now enabled. The next time you sign in to 247connect, you'll need to enter the code from your authenticator app.
Enable or disable 2FA
Local users can enable or disable 2FA on their own accounts. Users with the appropriate permissions can disable 2FA for other local users, but they can't enable it for them.
Manage your own 2FA
-
Click the Profile
icon in the top menu. -
Select the Profile tab.
-
Toggle 2FA Enabled on or off.
Disable 2FA for another user
-
Go to Account > Users in the side menu.
-
Click the required user from the list.
-
Select the User details tab.
-
Toggle 2FA Enabled off.
See also: