Manage account settings
You can configure key account-wide preferences, such as enabling local users to update their own profiles, requiring local users to use 2FA, setting invitation time limits, choosing how users' names appear during a remote session, applying custom logos at the Agent and integrating with third-party solutions such as Microsoft and ServiceNow.
Access account settings
-
In the 247connect Web Portal, go to Account > Settings in the side menu.
-
The settings page has three tabs: Settings, Microsoft integration and ServiceNow integration.
Settings
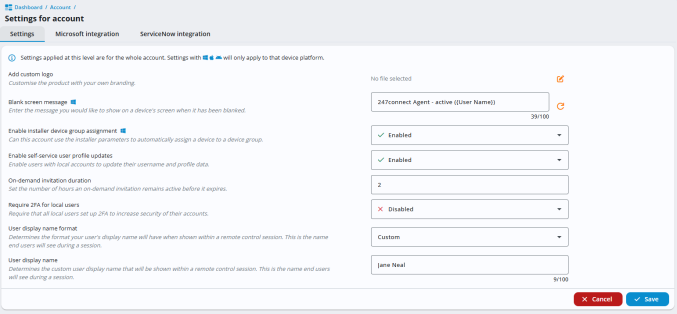
Add custom logo
-
To upload a logo, click Edit
 and select Choose file.
 -
To remove the logo, click Edit
and then Delete .
.
-
Logos must be in .jpg, .jpeg or .png format and no larger than 3MB.
-
The size of the custom logo in the Agent window is 312 x 79 pixels (approximately 4:1). 247connect resizes the logo to fit but does not change its aspect ratio.
Blank screen message (Windows only)
Enter a custom message to display on the device's screen when you blank it. By default, the message is: 247connect Agent - active {{User Name}}. To change it, type over the text. To revert to the default message, click the Reset to default![]() icon.
icon.
Enable installer device group assignment (Windows only)
Set whether this account can use the installer parameters to automatically assign a managed device to a device group during installation. For details on how to do this, see Assign Windows managed devices to a device group during installation.
Enable self-service user profile updates
Enable users with local accounts to update their own profile information, including their username.
On-demand invitation duration
Set how long an on-demand invitation stays active before it expires. By default, invitations expire after 2 hours. You can change this time, up to a maximum of 24 hours.
Require 2FA for local users
Improve the security of local users' accounts by requiring them to set up and use two-factor authentication (2FA).
User display name format
Choose how user names are shown to end users during remote control sessions:
-
First name and last name: Example, John Smith.
-
Email: Example j.smith@247connect.com.
-
Custom: Enter a custom name, such as Supported by Your Company Name. This applies to all sessions.
User display name
If you select Custom, enter the name you want end users to see.
Click Save.
Settings take effect immediately and apply to all remote control sessions.
Microsoft integration
Linking your Microsoft account enables 247connect to access the data needed to support rule-based device assignment.

Setup Microsoft integration
Click Setup to connect your Microsoft 365 account. Sign in with your Microsoft Entra ID administrator account and review the required permissions (see Microsoft Graph permissions for details).
After authentication, your tenant details are displayed. If additional permissions are added in the future, you can click Update Consent to approve them.
Click Save.
ServiceNow integration
Use these settings to control what information 247connect sends to ServiceNow.
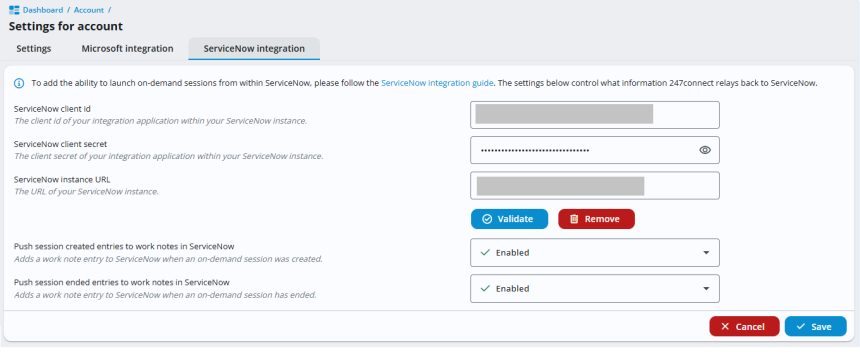
ServiceNow Client ID
Enter the Client ID from your ServiceNow integration application.
ServiceNow Client Secret
Enter the Client Secret associated with your integration application.
ServiceNow instance URL
Enter the URL of your ServiceNow instance.
To check the connection and confirm that the credentials are correct, click Validate and then click Save. If validation fails, review the details and try again. To remove the current configuration, click Remove.
Push 'session created' entries to work notes in ServiceNow
Adds a work note entry when a new on-demand session is created.
Push 'session ended' entries to work notes in ServiceNow
Adds a work note entry when an on-demand session ends.
Click Save.
See also:
Setting up two-factor authentication (2FA)