Add users
If you have the required permissions, you can invite users to join your 247connect account.
Invite users
-
Go to Account > Users in the side menu.
-
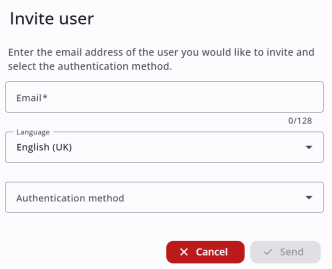
Click Invite user.
-
Enter the user's email address.
-
Choose the language for the invitation email. This defaults to the language set for the currently logged-in user in the Web Portal.
-
Select an authentication method from the drop-down list:
Apple: Users authenticate using their Apple credentials.
Local: Users authenticate directly with 247connect using their email and password.
Microsoft: Users authenticate using their Microsoft credentials.
Google: Users authenticate using their Google credentials.
-
Click Send.
The user appears in the list with a status of Invited until they complete their registration. They'll receive an email asking them to confirm their email and complete their 247connect profile. To resend the invitation, click the Resend invite ![]() icon.
icon.
See also:
Assign an On-demand licence to a user


