Create a role
In addition to the Global Administrator role (which can't be edited or deleted), 247connect includes two pre-defined roles. You can create your own custom, define their permissions or clone an existing role.
Create a role
-
In the 247connect Web Portal, go to Account > Roles in the side menu.
-
Click Add role.

-
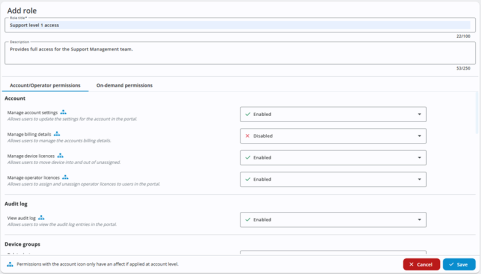
Enter a role name.
-
(Optional) Add a description of the role's purpose or permissions.
-
Set the role permissions. By default, no permissions are selected.
Note: Account-level and on-demand permissions must be assigned at the account level to take effect. These are identified by the Account icon.
icon. -
Click Save.
Clone a role
To save time when creating new roles, you can clone an existing one. This is useful when the new role needs similar permissions to an existing role.
-
In the 247connect Web Portal, go to Account > Roles in the side menu.
-
Select the Clone
 icon next to the role you want to copy.
 -
In the Confirmation dialog, you can enter a new name for the role. Click Clone.
-
The new role appears in the list.
-
Click the Edit
 icon to adjust its permissions.
See also:


