Device assignment
Use device assignment to move new managed devices into the correct device group automatically. When a device appears in Unassigned, 247connect checks it against your rules. If the device matches a rule, it moves it to the device group specified in the rule. You can create several rules and 247connect checks each one in turn.
-
A device can only be assigned once. If you move devices back to the Unassigned group, they are not automatically reassigned.
-
Rules are applied in the order they appear in the list. You can reorder as needed.
-
If Enable installer device group assignment is enabled in the account settings, assignment can be delayed by up to five minutes. Otherwise, assignment rules are processed in batches, so there may be a short delay before a device is moved.
Create an assignment rule
-
Go to Account > Device assignment in the side menu.
-
Click Create.
-
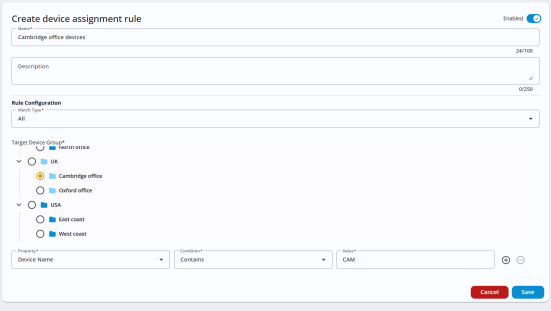
Enter a name and description for the rule.
-
From the Rule configuration drop-down, choose the Match type:
-
All: The device must match every condition.
-
Any: The device can match any one of the conditions.
-
-
Select the device group you want matching devices to move to.
-
Add a condition:
-
Choose a property that's used to identify the device (for example, device name, operating system name, device type, etc).
Note: To see the Entra - Group ID and Entra - Group name properties when creating rules, you need to link your Microsoft Entra account in Settings. Linking your account allows 247connect to retrieve group information from your Microsoft tenant so that these properties can be selected. -
Choose a condition (for example, contains, does not contain, equals, etc).
-
Enter a value to match when applying the rule.
Note: Make sure the value contains no spaces. If it does, the rule won't run. To check, hover over the value - any spaces will appear as an asterisk (*).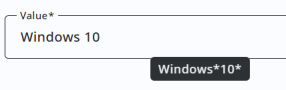
-
-
To add another condition, click the Add
 icon.
icon. -
By default, the rule is enabled. Use the Enabled toggle to turn it on or off.
-
Click Save.
Note: New rules appear at the bottom of the list. Drag and drop them into the order you want 247connect to apply them.
View and manage assignment rules
A list of your assignment rules and their target device group is shown. Rules are applied in the order that they appear. Click the Move ![]() icon to drag them into the required order.
icon to drag them into the required order.
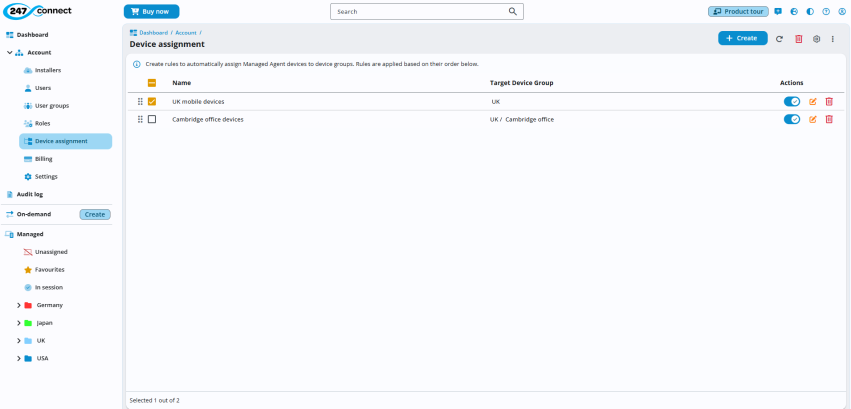
From the Actions column, you can:
-
Enable or disable a rule.
-
Edit a rule.
-
Delete a rule.
Note: You can delete multiple rules at once by selecting them and clicking the Delete icon at the top of the pane.
See also: