Integrate 247connect with ServiceNow
ServiceNow is an IT service management (ITSM) platform used to manage incidents and support workflows.
You can integrate 247connect with ServiceNow to launch on-demand sessions directly from ServiceNow incidents and optionally send session data back to ServiceNow to update incident activity.
You can configure one or both parts of the integration:
-
Create an on-demand session button (required)
-
Enable data synchronisation from 247connect to ServiceNow (optional).
Create an on-demand session button in ServiceNow
This configuration adds a button to ServiceNow that launches 247connect and creates an on-demand session.
Create UI action
-
In ServiceNow, go to All > System UI > UI Actions.
-
Click New.
-
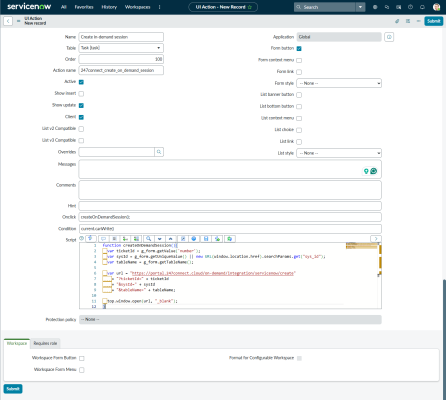
Configure the following fields:
-
Name: Enter a name for the button, for example, 'Create on-demand session'
-
Table: Task
-
Action name: 247connect_create_on_demand_session
-
Active: true
-
Show insert: false
-
Show update: true
-
Client: true
-
List v2/v3 compatible: false
-
Application: Global
-
Form button: true
-
Onclick:
createOnDemandSession(); -
Condition:
current.canWrite()
-
-
Paste the following into the Script field:
Copyfunction createOnDemandSession(){
var ticketId = g_form.getValue('number');
var sysId = g_form.getUniqueValue() || new URL(window.location.href).searchParams.get("sys_id");
var tableName = g_form.getTableName();
var url = "https://portal.247connect.cloud/on-demand/integration/servicenow/create"
+ "?ticketId=" + ticketId
+ "&sysId=" + sysId
+ "&tableName=" + tableName;
top.window.open(url, "_blank");
} -
Click Submit.
A button appears on incident records. When you click it, the 247connect Web Portal opens in a new tab and automatically creates an on-demand session.
Enable data synchronisation from 247connect to ServiceNow (optional)
This configuration enables 247connect to send session data back to ServiceNow.
Step 1 - Enable client credentials flow
-
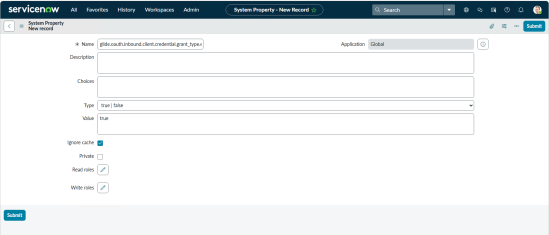
In ServiceNow, go to All, enter
sys_properties.listin the navigation filter. -
Press Enter and click New.
-
Complete the following fields:
-
Name: glide.oauth.inbound.client.credential.grant_type.enabled
-
Type: true | false
-
Value: true
-
Ignore cache: true
-
-
Click Submit.
Step 2 - Create an integration user
-
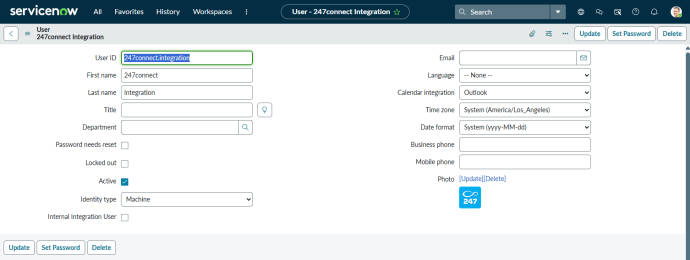
Go to All > Organization > Users.
-
Click New.
-
Configure the following fields:
-
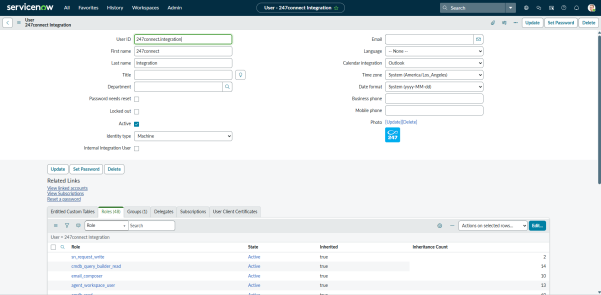
User ID: 247connect.integration
-
First name: Enter a first name
-
Last name: Enter a last name
-
Active: true
-
Identity type: Machine
Note: You must enter both a first and a last name. Otherwise, activity does not appear in incidents. -
-
(Optional) Add a logo that appears next to the activity by clicking Click to add next to Photo.
-
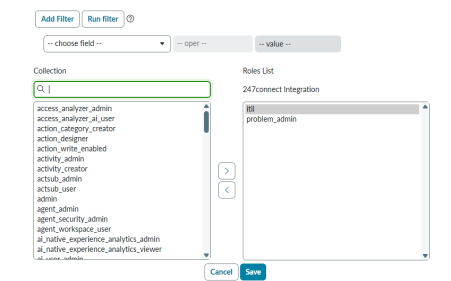
Assign roles to the user. Select the Roles tab and click Edit.
-
Add
Itilfor incidents andproblem_adminfor problems. Add any custom roles required for your task types. -
Click Save.
-
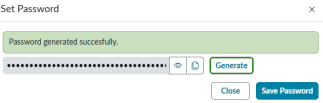
Click Set password.
-
Click Generate.
-
Click Save password, then Close.
-
Click Update.
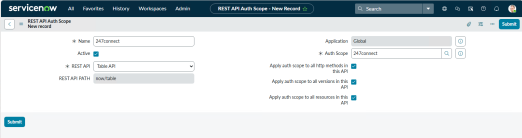
Step 3 - Create a REST API auth scope
-
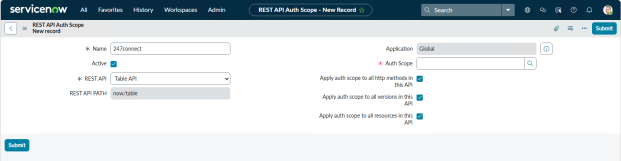
Go to All > System Web Services > API Auth Scopes > REST API Auth Scope.
-
Click New.
-
Configure the following fields:
-
Name: 247connect
-
Active: true
-
REST API: Table API
-
Apply auth scope (all): true
-
-
Click the Search icon in the Auth scope field.
-
Click New.
-
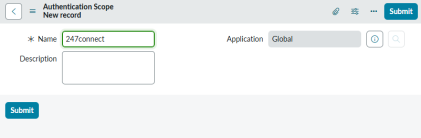
Enter
247connectin the Name field. -
Click Submit.
-
Click Submit again.
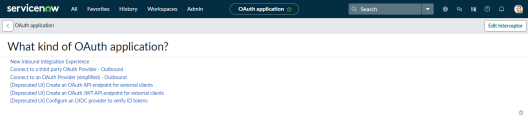
Step 4 - Create an OAuth application
-
Go to All > System OAuth > Application Registry.
-
Click New.
-
Select [Deprecated UI] Create an OAuth API endpoint for external clients.
-
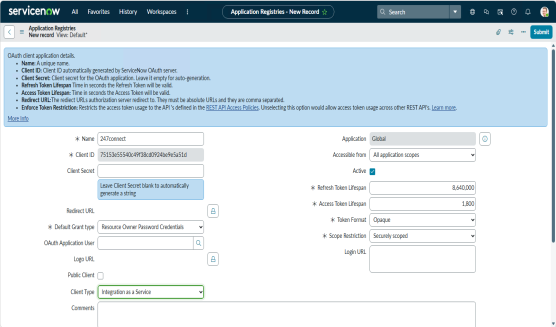
Complete the following fields:
-
Name: 247connect
-
Client type: Integration as a Service
-
Active: true
-
-
Click Submit.
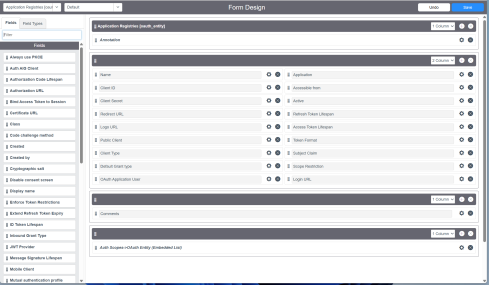
Step 5 - Update the OAuth application form
-
Open the OAuth application created above (step 4).
-
Click the Hamburger
 icon on the top bar.
 -
Select Configure > Form Design.
-
Add the following fields to the form:
-
Default Grant Type
-
OAuth Application User
-
-
Click Save and close the browser tab.
Step 6 - Configure the OAuth application
-
Open the OAuth application created in step 4.
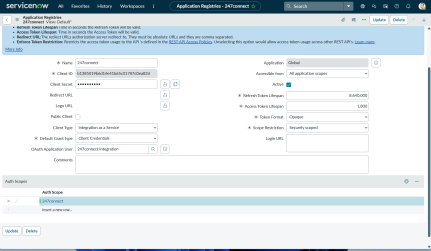
-
Configure the following field:
-
Default grant type: Client Credentials
-
-
Click the OAuth application user Search icon and select the name of the user you created in step 2.3.
-
Under Auth scopes, double click to insert a new row, click the Search icon and choose the 247connect scope.
-
Click the Save
 icon.
icon. -
Click Update.
Step 7 - Connect to 247connect
-
Open the 247connect OAuth application you created in step 4.
-
Copy the Client ID and Client Secret.
-
In the 247connect Web Portal, go to Account > Settings and select the ServiceNow integration tab.
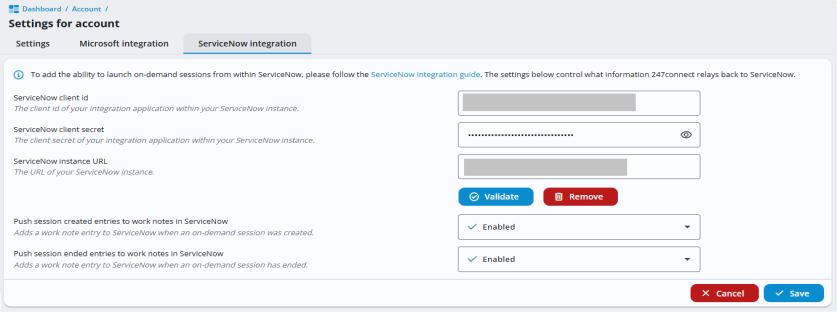
-
Enter the ServiceNow instance URL (e.g. https://your-instance.service-now.com), Client ID and Client Secret.
Note: You can also control which session entries 247connect sends to ServiceNow from here. -
Click Save.
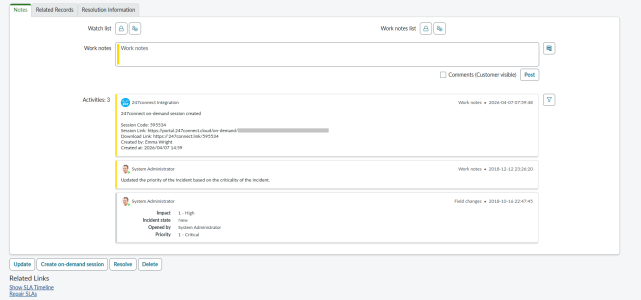
247connect can now send session data back to ServiceNow incidents.
Use the on-demand session button
After setup, you can create a 247connect on-demand session directly from a ServiceNow incident.
Start a session
-
Open an incident in ServiceNow.
-
Click Create on-demand session (or the name you configured).
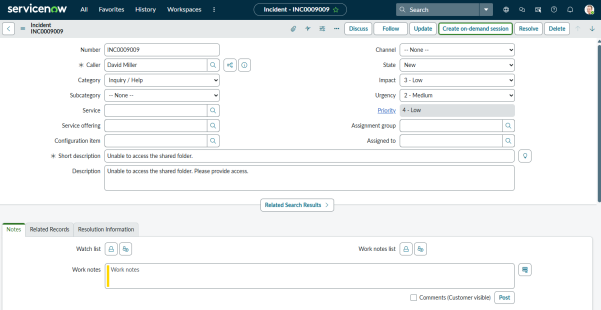
-
A new browser tab opens and loads the 247connect Web Portal.
-
An on-demand session is created automatically.
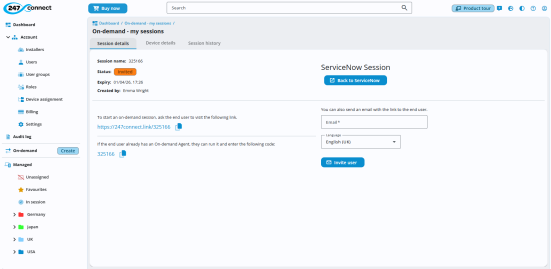
-
Start the on-demand session with the end user.
-
When you finish the session, click Back to ServiceNow.
-
Session details are added to the incident activity (if data synchronisation is enabled).
See also:


