On-demand sessions
With on-demand sessions, you can provide remote support without requiring pre-installed software on the end user’s device. These sessions are quick to set up and are ideal for troubleshooting, software installation and other support tasks.
End users can join a session by clicking a link and entering a session code. Once connected, they can approve or reject remote access requests.
- You can download a generic On-demand Agent from our website. Users can share the direct download link with end users. This version does not display a session code, so the user must create an On-demand session and provide the end user with a code to enter.
-
By default, an on-demand invitation expires after two hours. You can change the duration in the account settings, up to a maximum of 24 hours.
-
You can customise the branding that appears in the Agent window by adding your own logo. Go to Account > Settings to upload it.
-
You must have the Control component installed (Windows, iOS or macOS) to start and run an on-demand session.
Create an on-demand session
-
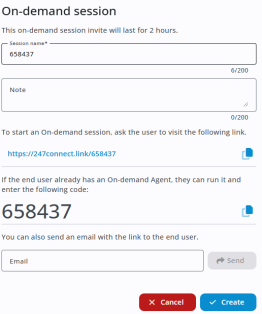
Go to On-demand in the side menu and click Create.
-
Enter a session name - this is pre-filled with the session code (you can change this).
-
(Optional) Enter a note to describe the session.
-
A session link and code are displayed. Ask the end user to visit the link, or enter the end user's email address to send the session link by email.
-
Choose the language for the invitation email. This defaults to the language set for the currently logged-in user in the Web Portal.
-
If the end user already has the On-demand Agent installed, they can enter the session code instead of using the link.
-
Click Create.
Note: Click Copy to copy the link or session code.
View session details
After you create an on-demand session, you can view its details from your sessions list.
When you select a session, the page that opens depends on the session status:
-
For Invited sessions, the Session details tab opens automatically.
-
For Available or Active sessions, the Device details page opens by default.
To view session information at any time, select the Session details tab.
End user steps to join the on-demand session
-
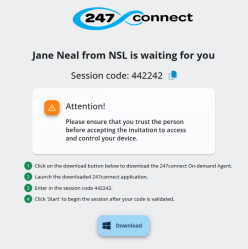
Open the session link and click Download to get the 247connect On-demand Agent.
-
Launch the downloaded 247connect file.
-
Enter the session code provided by the 247connect user.
Notes:You have five attempts to enter the code correctly. After this, you must wait before trying again.
247connect automatically enters the session code when you run the Agent from the link and the web page is open in the active tab.
-
Click Start.
The 247connect On-demand Agent window shows that the session is ready and waiting for the user. The end user can end the session from here at any time.
Start the on-demand session
When the session status changes to Available, click an icon in the Actions column to interact with the end user's device.
Selecting a session shows the device details (system and hardware information) for the end user's device.
-
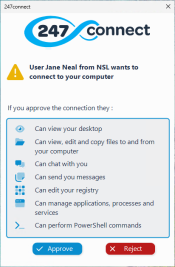
When prompted, click Open to launch the 247connect Control. To skip this step in the future, select Always allow portal.247connect.cloud to open links of this type in the associated app.
-
The Control component loads.
-
The end user sees a message showing the user, the company and the actions you're requesting to perform. They can approve or reject the connection request.
-
Once connected, the 247connect On-demand Agent window shows the assigned user and the current remote control action(s).
End an on-demand session
From the Web Portal
-
After completing the remote actions, close the Control component.
-
In the Web Portal, click End session in the toolbar.
-
Confirm by clicking Yes.
The session ends and the On-demand Agent is removed from the end user's device.
From the On-demand Agent
The end user can end the session at any time.
-
In the On-demand Agent window, click End Session.
-
Confirm by clicking End.
This also removes the On-demand Agent from their device.
See also:
Integrate 247connect with ServiceNow


